Radare2 Adventures: Level1-crackMe
Everybody has to start somewhere. You have your whole future ahead of you. Perfection doesn’t happen right away - Haruki Murakami
Apologies for any rough images, they were migrated from blogger.
Intro
I am excited right now.
After my first interaction with a CTF challenge on Reverse Engineering at Africa HackOn 2018, I fell in love. Many things came to mind on the capabilities one can do with such a skill. This post will share the basic need to know with an example. The learning curve will be steep; you might end up in a rabbit hole from researching from one place to the other.
Don’t overthink; relax. After a couple of tries, you will get the hang of it, and remember always to perfect your craft (Practice, Practice, Practice). LiveOverflow’s Tips to Master Something
So what is Reverse Engineering; it’s the process of Acquiring anything artificial, Analyzing it, and then Disassembling** to understand how it works and acquire any informative knowledge about it.
We have a binary file named CrackMe1.bin, a program that has been compiled and converted to machine code.
When given such a file, I usually perform a few steps before opening it with Radare2, IDA, or binary ninja (disassembly tools).
- Confirm the file format.
- Execute the file to understand what task you are given to solve.
- Check the data strings of the file.
File format

img-1: file crackMe1.bin
On linux you can use the Linux file command or using rabin2, Radare2 tool for extracting information from binary programs.
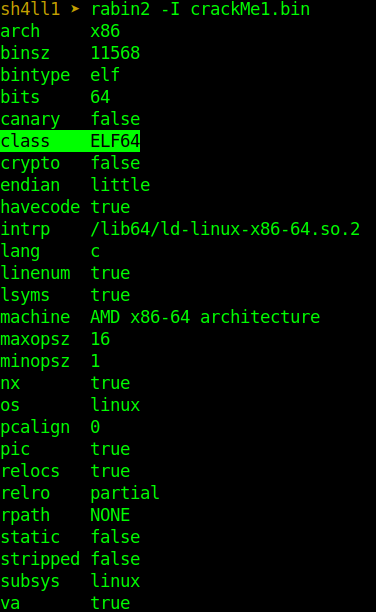
The -I option is for extracting binary information. So we have an ELF (Executable and Linkable Format) class 64 binary file. Take note that we are going to use this information later on.
Another way of checking file format that mostly comes in handy when dealing with embedded data is to open the file in a hex editor, identify the file header signatures, and extract the embedded data.
img-2: rabin2 -I crackMe1.bin
Running the file
Binary files require execution rights to be added so that they can be executed.
# checking for execution rights
ls -l crackMe1.bin
# giving execution right to binary file
chmod +x crackMe1.bin
# executing the file
./crackMe1.bin

img-3: running the binary file
So when running the file, you will be prompted for a password, and when you type in anything like 1234, it will return a Bad password string output.
Strings
The above image shows that the program outputs several words, but the word password is the most common. Hence while analyzing the program strings, we are going to search for lines that contain the string password.
There are two methods of doing this: the strings UNIX command or our tool of choice, radare2, as shown in this section.
So because we know we have a bad password string, let’s try and see if we have any other data string with the password string.

img-4: strings crackMe1.bin | grep "password"
Good password, so our main goal is to get the correct password.
When I started learning reverse engineering, my tool of choice was IDA until I met Radare2, and hence this post. I am still learning, and to be honest, the image below says it all.

Reversing
Analysis

So we begin by examining the file by executing r2 crackMe1.bin. Currently, we are in shell mode, where we can run our commands, and by default, we are taken at the entry address [0x000008a0].
The first command ie is the entry points info command, which prints the entry points.

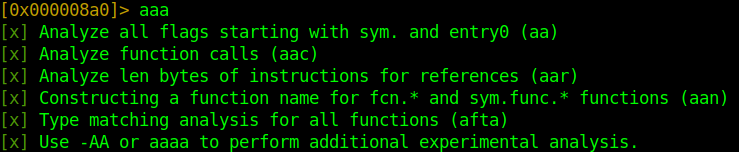
Next, analyzing the program using the command aaa (a?; gives you different command options). Remember not to skip this bit because radare2 doesn’t analyze automatically by default, but you can run this command when running the binary file.
# this will allow us to avoid running aaa
r2 -A CrackMe1.bin
Next step is to view strings and find our good password string location address.
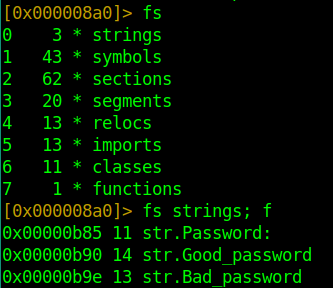
After analyzing all flags, we can list them using the fs command, which means flag space. As we can see, we have a strings flag space, and we proceed to view its contents using the command fs strings; f (the f option is used to print contents).
It prints each string starting with its address location, length, and the actual string.
Next, we are going to find the code reference for our str.Good_password reference.
axt @@ str.Good_password

Disassembly
The fun part is disassembling the program.
In every program, we have a global function called main, which serves as the starting point for the program execution. The program will also allow us to understand the program execution.
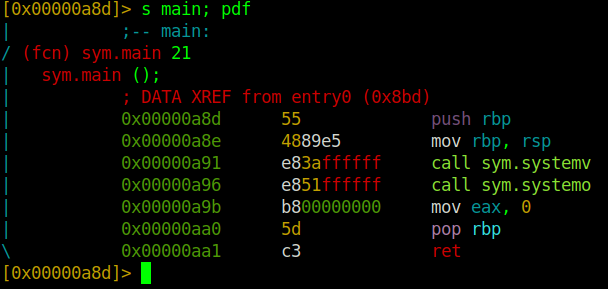
That being the case, we will enter the main function using the command s main; pdf, where s means to seek, and the pdf` command disassembles the function.
Before we understand our function, know that we are currently looking at the assembly language. You, as a reader, are required to have a basic understanding of the stack and how it works, know how to read assembly language, and have basic knowledge of C and C++ programming languages.
; main func
push  rbp           ; store base pointer in the stack
mov   rbp, rsp      ; make the stack pointer the new base pointer
call  sym.systemv   ; call function systemv
call  sym.systemo   ; call function systemo after systemv has ended
mov   eax, 0        ; move zero to register eax
pop   rbp           ; get the old base pointer
ret                 ; return - end of program
The program starts by pushing the base pointer rbp to the top of the stack, then makes the stack pointer the new base pointer. Proceeds to call two functions sym.systemv and sym.systemo, then move 0 to the accumulator register (eax), get the base pointer from the top of the stack, and perform a subroutine return (ret).
So we are going to focus on the two functions being called.
First function: systemv
From the code below, we can note the function’s main purpose is to set the variables.
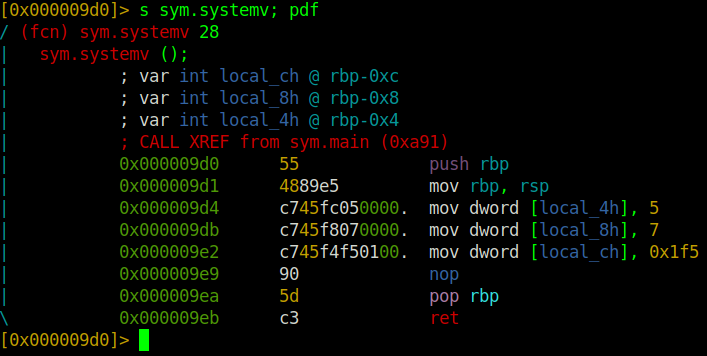
; systemv func
push  rbp                     ; routine command
mov   rbp, rsp                ; routine command
mov   dword [local_4h], 5     ; mov the 32-bit int rep of 5 into the 4bytes stack-location
mov   dword [local_8h], 7     ; mov the 32-bit int rep of 7 into the 4bytes stack-location
mov   dword [local_ch], 0x1f5 ; mov the 32-bit int rep of hex 0x1f5 == 105 into the 4bytes stack-location
nop                           ; nop-sled
pop rbp                       ; routine command
ret                           ; return end of program
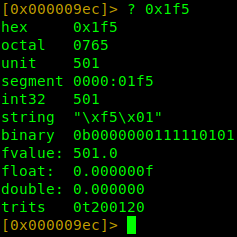
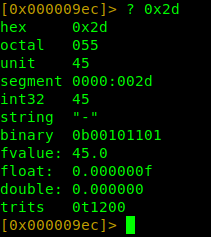
To convert a hexadecimal value in r2 you can do the following in the shell: ? 0x1f5
/* current variables */
int local_4h = 5;
int local_8h = 7;
int local_ch = 501;
r2 can perform arithmetic calculations and convert hex to different data types as seen in the image on our left.
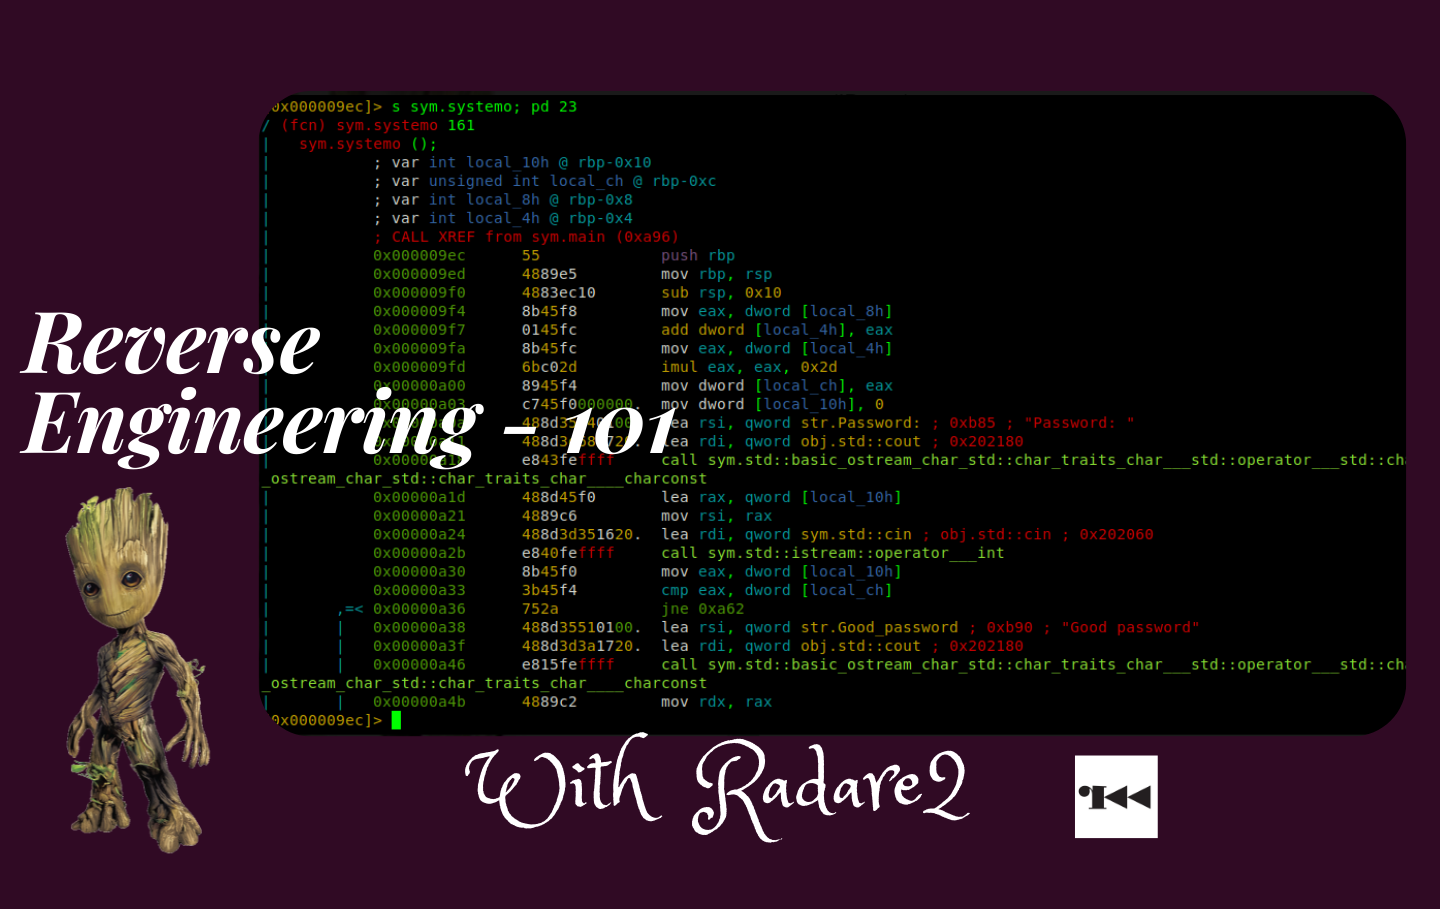
Second function: systemo
So let’s go on ahead and see what the second function is doing.
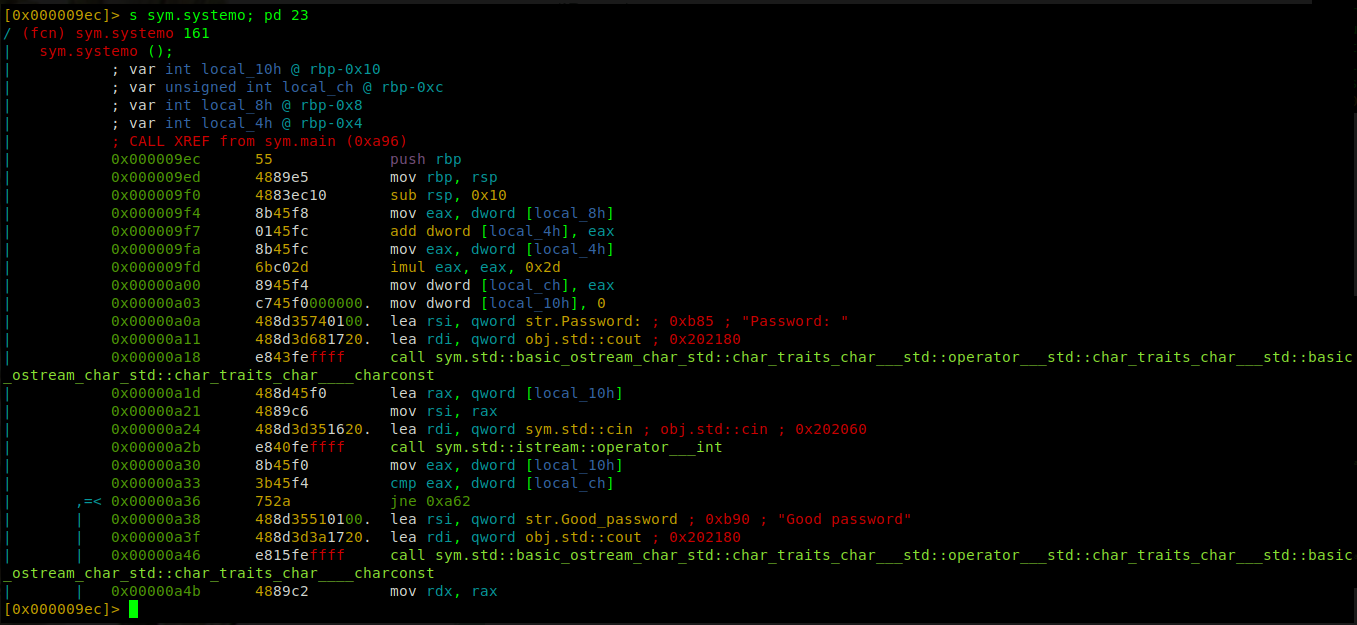
The image is not visible, but I will fix that issue in future posts. Below is the whole code re-written when migrating from blogger.
; just realized this is a c++ program date 03/05/22
;
push    rbp                           ; routine command
mov     rbp, rsp                      ; routine command
sub     rsp, 0x10                     ; set up space in the stack of size 16bytes
mov     eax, dword[local_8h]          ; mov value 7 to eax
add     dword [local_4h], eax         ; add value 7 to value 5 at local_4h and store the result in local_4h
mov     eax, dword [local_4h]         ; mov value at local_4h to eax
imul    eax, eax, 0x2d                ; multiply value at eax by 45 and store the result in eax (imul eax, 0x2d)
mov     dword [local_ch], eax         ; mov 32bit int rep of value at eax into the 4bytes stack-location
mov     dword [local_10h], 0          ; mov 32bit int rep of value 0 into the 4bytes stack-location
lea     rsi, qword str.Password       ; load address of string Password to rsi
call    something...                  ; print str.Password
lea     rax, qword [local_10h]        ; load address of stack variable [local_10h] to rax variable
mov     rsi, rax                      ; mov address at rax to rsi
lea     rdi, qword [0x202060]         ; load address to rdi
call    something...                  ; call function that will take user input
mov     eax, dword [local_10h]        ; mov 32bit int rep of value at local_10h to eax
cmp     eax, dword [local_ch]         ; compare value at eax with value stored at local_ch
jne     0xa62                         ; if compare is not equal, I think it will lead to print Bad password
lea     rsi, qword str.Good_password  ; load address of string Good_password to rsi
lea     rdi, qword 0x202180           ; load address 0x202180
call    something...                  ; call while passing two arguments rdi, rsi
From the above code, we can see the second function contains our string Good password; when I was writing this post in 2018, I had noted that I wasn’t going to explain the whole code but the essential bit of the code that led us to our string. 4years later, I can explain the entire code. I even found a quick way to solve this challenge when reading the code. Emphasize on keep practicing.
Solving
Because I am writting this post once more, I will do what I wasn’t able to do last time, explain everything. I believe this is a second chance so let me take advantage of it and show off.
So the first function loads the values to variables later used in the second function. After getting our new base pointer, we can see the program is reserving space in the stack of size 0x10. It then moves the value stored at variable local_8h to register eax, then adds the value at eax with the value stored at variable local_4h. Then moves results of the addition to the register eax.
Then we proceed to multiply using the imul instruction. imul eax, eax, 0x2d is an extended hand for imul eax, 0x2d, which takes the value stored at eax and multiplies it by 0x2d. Then holds the new value at register eax, which is then moved to variable local_ch.
local_8h = 7
local_4h = 5
local_ch = 501
local_10h = user_input

eax = local_8h
local_4h = local_4h + eax
eax = local_4h # 12
eax = eax * 45 # 540
local_ch = eax # 540
We you read the code above, the next few instructions executed allow the program to print Password and ask for user password input. Hence no need to explain them twice.
After the user has keyed in his password, it is stored at variable local_10h. Then later moved to register eax, which is compared to the value stored at variable local_ch.

If both values are equal, the next instruction executed will print Good password, resulting in us successfully solving the challenge. But if they are not equal, it will take a jump to address 0xa62, which I think will print the string Bad password as we had seen before while running the program.
If you check the compare instruction, you can see we have our password at two variables; local_10h and local_ch. Where we already know the value for variable local_ch.
So our password is 540.
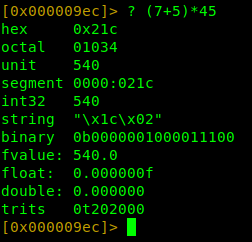
r2 doing arithmetics
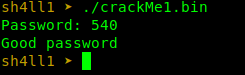
We have our password
Bonus
Quick and easy solve
Another quicker method of solving this challenge would be to set a breakpoint at the comparison instruction cmp then view the value stored at variable local_ch and boom we have the password. Quick and easy.
Translating the challenge to C
#include <atdioh>
/**
 * main
*/

void systemv(void) {
  int local_4h = 5;
  int local_8h = 7;
  int local_ch = 105;
}

void systemo(void) {
  int local_10h;
  int local_ch = 0;

  local_ch = (local_8h +  local_4h) * 45;

  printf("Password");
  scanf("%d", &local_10h);

  if (local_10h == local_ch)
    printf("Good password");
  else
    printf("Bad password");
}

int main(void) {
  systemv();
  systemo();

  return (0);
}
Resources
The following will get you started, Enjoy.
- Megabeets; A journey into Radare2 - Part 1: simple crackme
- Sushant; An intro to radare2
- x86 Assembly Guide
- Intel’s Intro to x64 Assembly
- Intro to x86-64 Assembly for Compiler Writers
- A good read > h3h3
- Stack wiki
- RE for Beginners
- Radare2 Git Book
There we have it folks, easy as done, see you in the other realm.